
I was anxious to get started playing with the capabilities of the micro:bit, so I loaded up their online IDE and started playing! Unfortunately I very quickly discovered that the download functionality only works in Chrome…grr.
I did some small silly projects first to get familiar with the interface.
- roll a d6 when you push a button
- roll a d20 when you push a button (this was a bit annoying as you can only display a single digit/character on the screen, so the value has to be displayed using the scroll functionality
- display the current temperature
- display the heading
Arrow Compass
I then decided to make it into a rudimentary compass (since I’ve been doing a lot of orienteering lately). The basic idea is anytime the A button is pressed to draw an arrow pointing as close to North as possible. Since the micro:bit default arrows only point in the eight directions, I’m going to define “as close as possible” to mean within plus/minus 22.5deg of North.
Since there’s only eight arrows I could write out all eight equations, but that’s not fun.
So what's the appropriate mapping from orientation (values between 0 and 360) and produces an arrow Image?
If we number the arrows 0 to 8 starting at North and moving clockwise (with N being both 0 and 8) we can write: $$arrow_i = ceil(\frac{orientation - 22.5}{45})$$With that, it’s a simple matter to convert the index into an Image object of the correct type. The only “gotcha” was the fact that the arrow direction had to be flipped E->W from what you’d normally expect. For example, if the micro:bit is “facing” due East, then heading is 45, but we want to draw an arrow point to the “left” on the micro:bit. To draw an arrow pointing left we use an Arrow_W.
Improved Compass
We can actually make a better compass by using the individual “pixels” on the micro:bit. There are 16 pixels along the outer ring allowing us to cut our maximum error in half (from 22.5deg to 11.25deg)! This time instead of converting the heading into 8 indices, we’ll convert it into 16:
\[i=ceil(\frac{orientation - 11.5}{22.5})\]But now instead of using the Image.Arrow we need to illuminate individual pixels. To do this, I’ll use the display.set_pixel method where the pixel indices are given by the following image
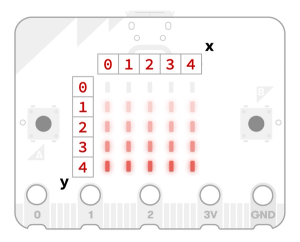
This time I just took an ugly approach to converting the index of the heading to a pair of (x,y) pixels. Note that I use +1 in the range functions to make the actual values being compared against more obvious (i.e. 3 in range(0,3) evaluates to False).
This code works ok, but I had to play some games with clearing the display (only when the point has moved) to prevent flickering. You will also get flickering between two pixels when you are very close to a boundary.
Ultimate Compass
Ok, I think I have one more improvement that we can make to this toy compass app. What if we use the intensity of the pixel to convey even more accuracy? So the brighter the pixel, the closer we are to exactly that value.
On the micro:bit each pixel can take one of 10 intensity values (0 to 9 where 9 is fully on and 0 is fully off). We now need to define a function that converts heading to pixel intensity for all of the 16 pixels.
To do so we will (arbitrarily) define an intensity magnitude function based on the deviation of the LED’s “position” on the array compared to the measured heading. We can then re-use much of the code from the last demo to convert “index” of the pixel to an array position and instead of having to clear the display we will simply write our intensity value to all pixels each update cycle.
I’m not thrilled with the results when the A-button is held. I will probably keep working on it.
Final Thoughts
I’m pretty impressed with this as a tool for learning Python development. The IDE is reasonably featured and includes pretty darn good syntax validation as well as type checking and support for Python type hinting. It even includes a serial console for some of the unhandled exceptions. Lack of debug capability will prevent any serious use of the web-based IDE. Frankly, this was a fun couple of hours :) Time to think about my next project as well as getting the micro:bit up and running under Visual Studio Code.
Code
The full code for the various examples is here!
Arrow Compass Code
from microbit import *
from math import ceil

arrow_map =['N', 'NW', 'W', 'SW', 'S', 'SE', 'E', 'NE', 'N']

def which_arrow(direction)->Image:
    if direction == 'N':
        return Image.ARROW_N
    elif direction == 'NE':
        return Image.ARROW_NE
    elif direction == 'E':
        return Image.ARROW_E
    elif direction == 'SE':
        return Image.ARROW_SE
    elif direction == 'S':
        return Image.ARROW_S
    elif direction == 'SW':
        return Image.ARROW_SW
    elif direction == 'W':
        return Image.ARROW_W
    elif direction == 'NW':
        return Image.ARROW_NW
    else:
        return Image.ANGRY

while True:
    if button_a.is_pressed():
        if not compass.is_calibrated():
            compass.calibrate()
        orient = compass.heading()
        i = int(ceil((orient - 22.5)/45))
        display.show(which_arrow(arrow_map[i]))
Improved Compass Code
from microbit import *
from math import ceil

def index_to_x(index)->int:
    if index in range(2,6+1):
        return 0
    elif index in range(10,14+1):
        return 4
    elif index == 1 or index == 7:
        return 1
    elif index == 0 or index == 8 or index == 16:
        return 2
    elif index == 9 or index == 15:
        return 3
    return 2

def index_to_y(index)->int:
    if index in range(0,2+1) or index in range (14,16+1):
        return 0
    elif index in range(6,10+1):
        return 4
    elif index == 3 or index == 13:
        return 1
    elif index == 4 or index == 12:
        return 2
    elif index == 5 or index == 11:
        return 3
    return 2

prev_index = -1
while True:
        #if button_b.was_pressed():
        #    #display.scroll(random.randint(1, 20))
        if button_b.is_pressed():
            display.scroll(temperature()*1.8+32)
        if button_a.is_pressed():
            if not compass.is_calibrated():
                compass.calibrate()
            orient = compass.heading()
            i = int(ceil((orient - 11.25)/22.5))
            if prev_index != i:
                display.clear()
                prev_index = i
            display.set_pixel(index_to_x(i),index_to_y(i),9)
Ultimate Compass Code
from microbit import *

def f(x, orient):
    v = int(-5/10 * abs(orient-x) + 10)
    if v < 0:
        return 0
    elif v > 9:
        return 9
    else:
        return v

def index_to_x(index)->int:
    if index in range(2,6+1):
        return 0
    elif index in range(10,14+1):
        return 4
    elif index == 1 or index == 7:
        return 1
    elif index == 0 or index == 8 or index == 16:
        return 2
    elif index == 9 or index == 15:
        return 3
    return 2

def index_to_y(index)->int:
    if index in range(0,2+1) or index in range (14,16+1):
        return 0
    elif index in range(6,10+1):
        return 4
    elif index == 3 or index == 13:
        return 1
    elif index == 4 or index == 12:
        return 2
    elif index == 5 or index == 11:
        return 3
    return 2

angle = [22.5*x for x in range(0,16)]

while True:
        #if button_b.was_pressed():
        #    #display.scroll(random.randint(1, 20))
        if button_b.is_pressed():
            display.scroll(temperature()*1.8+32)
        if button_a.is_pressed():
            if not compass.is_calibrated():
                compass.calibrate()
            orient = compass.heading()
            intensity = [f(x, orient) for x in angle]
            for i in range(1,16):
                display.set_pixel(index_to_x(i),index_to_y(i),intensity[i])
            display.set_pixel(index_to_x(0),index_to_y(0),f(0,orient)+f(360,orient))